Posts

Real-time audio warping

Image
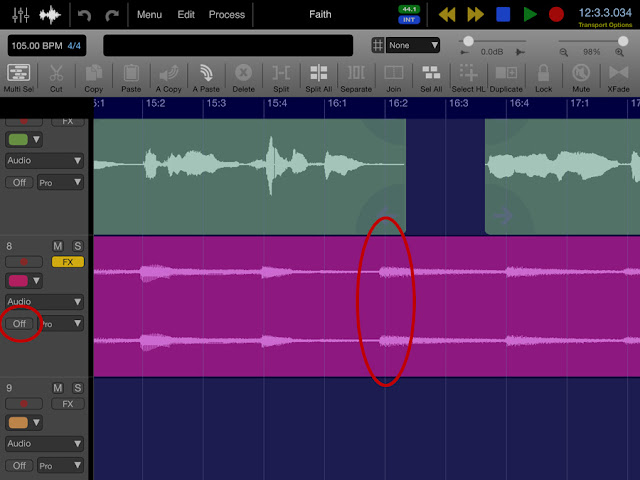
If your guitar playing is anything like mine you will usually need to tighten up your performances after you have recorded them. With Auria's real-time warping you can fix small timing errors or even completely change the feel of a rhythmic part. Here I have a guitar part where the timing is slightly out in places: First I need to anchor the waveform so I place the locator at a transient where the timing is good, and I go to Edit --> Transients --> Add Transient Marker: Then I add some more markers, including another anchor at the end of the section I want to warp: Next I tap the "trn" button to change its state to "warp" and move the transient markers to fix the timing: To help with adding the markers you can use the zoom function in the toolbar to magnify the waveform: With guitar strums I find it's generally better to have the transients placed just before the beat so that the main part of the strum coincides with th

Piano Roll Editing Basics

Image
You press the piano keys icon on the track to enter the piano roll, the zoom level is locked to the zoom of the timeline editor, so generally you will need to zoom in a little when editing notes. There are two snapping settings to consider, above the toolbar the global grid snap settings, and above the piano roll there is also a note length setting. Also there are two editing modes, the normal editing mode and a "draw" mode that allows you to quickly enter and edit notes. Tap the pencil icon to enter draw mode. In draw mode you tap to enter notes, the start of the note will be placed at your finger position and is affected by the global snap settings. You can tap and drag right to lengthen a note as you enter it. You can also lengthen or shorten notes interactively after they have been added by touching their right-hand edge and dragging. To delete a note, touch it. When you are  not  in draw mode you can still enter notes on the grid with a long press. Editing s

Locking selections

Image
This is a mini-tip that is going to be relevant to the next couple of tips I am going to post after this one. There is a hidden way to lock selections in Auria, which is to double-tap the Multi-Select button at the top left: Once you double-tap it a yellow padlock icon appears, this indicates your selection is now locked and can't be dropped until you double-tap the button again to unlock the selections: This can be used in the timeline with audio and MIDI files, and also in the piano roll editor with MIDI notes.

Record MIDI from Animoog:

Image
On a new MIDI track open the Channel Strip and add Animoog as a new instrument: Switch to Animoog, go to the Setup page and set Auria as the input and output. If you want to send Aftertouch make sure to activate the Send Ch. Pressure and Send Poly Pressure buttons: Then return to Auria, record-enable your MIDI track, set a count-in and start recording. Switch back to Animoog and play. The MIDI will be recorded:

How to use a MIDI track in a side chain:

Image
Here there is an audio track and a MIDI track, I want to use the MIDI track to gate the audio, so I create a third track which is an audio track: I set the output of my MIDI track to be Bus 1: Then I set the input of the newly created third track to also be Bus 1: Then on my first audio track (the one I want to gate) I add Pro G: At the top left of the plugin window there is a side chain input, I set this to be Track 3, which the MIDI is feeding into via Bus 1: Finally in the Pro G panel I click the "expert" tab and set the side chain to External:

Be aware of your buffer size

With audio tracks but no MIDI the maximum buffer size available is 4096, which allows for many plugins to run. However with MIDI tracks the highest buffer size available is 512 to allow for acceptable MIDI playback (this is an iOS limitation), so if you are using MIDI tracks you won't be able to run as many plugins. However if you separate the recording phase from the mixing phase, and freeze the MIDI to audio (you can use the "Bounce Track in Place" option in the Process menu) you can then increase the buffer size at the mix stage.

Using Channels as AUX Sends

Image
If you have an empty track you can set it's input from any of the AUX channels (there are 6 of them now), and any effects you add on that track can be dialed in to all the other tracks via the AUX send. The great thing about this is that you can for example EQ you reverb send separately from the main signal. If your reverb is too bright for example, simply put an EQ after it in the chain. Just be aware of one potential catch: if you put an effect on the AUX send itself, that will be blended with any busses in parallel - so if you want the chain to be in series leave the AUX slot on the master strip empty, and use a channel with the AUX as an input. Create a new track and select AUX 1 as the input: Any audio on this track will be ignored BTW. Next add your effects in series as inserts on this channel: Next, and this is a little counter-intuitive, leave the AUX input on the Master strip empty: Because if you add an effect there it will be blended in parallel with the other effect